Proxmox
Proxmox Virtual Environment is a virtualization platform that we use to manage our virtual machines (VMs) at WATcloud. Most1 bare-metal machines use the Proxmox installation disk for OS installation.
This page contains guides for common tasks related to Proxmox.
Provisioning a new Linux VM
This guide walks through the process of provisioning a new virtual machine (VM) on WATcloud. Most changes are made in the internal infra-config repo. Please familiarize yourself with the development process before proceeding.
In this guide, we will provision a new VM named ha-microk8s1 with the following specifications:
- The VM will be used to run a microk8s node in the on-prem Kubernetes cluster.
- The VM will make use of Proxmox’s HA feature to automatically migrate away from downed nodes.
- The VM will have a university-provided hostname so that it can receive traffic directly (without going through NAT).
Create a Terraform configuration for the new VM
The following is a standard Terraform configuration for an HA VM on WATcloud. Please review it carefully and adjust it as needed for your use case. For other types of VMs (e.g. non-HA development VMs), please refer to the repo for examples.
Please note the following:
- This VM is using the
vmbr0network bridge. This bridge is connected directly to the university network and is used when the VM needs to be accessed directly from the internet. The MAC address in the configuration is registered with the university. For a list of available MAC addresses for VMs, please refer to the latest version of this configuration. - This VM is using
all_disks_poolCeph pool for root disk storage. An HA filesystem is required for HA VMs. - This VM is created in the Terragrunt project
proxmox/misc-service-machines. We will run the provisioner for this project later. - This VM is cloned from the template
ubuntu-22-04-cloudinit-v1. This template is created using this script. - This VM will be created on the node
wato-thor. This is just for the initial deployment. After the VM is created, the Proxmox HA agent will manage the VM’s placement.
diff --git a/proxmox/misc-service-machines/ha-microk8s1.tf b/proxmox/misc-service-machines/ha-microk8s1.tf
new file mode 100644
index 0000000000..8b157e1e13
--- /dev/null
+++ b/proxmox/misc-service-machines/ha-microk8s1.tf
@@ -0,0 +1,75 @@
+# A microk8s VM that runs using Proxmox High Availability (HA) features.
+# When the host node fails, the VM will be automatically migrated to another node.
+
+resource "proxmox_vm_qemu" "ha-microk8s1" {
+  force_recreate_on_change_of = "v0.0.1"
+
+  name = "ha-microk8s1"
+  desc = "This VM is managed by Terraform. Please do not modify it manually."
+  target_node = "wato-thor" # just for initial deployment
+
+  clone = "ubuntu-22-04-cloudinit-v1"
+
+  bios = "ovmf"
+  cpu = "host"
+  cores = 2
+  memory = "10240" # MB
+  scsihw = "virtio-scsi-pci"
+
+  ciuser = "watonomous"
+  ipconfig0 = "ip=dhcp"
+  ipconfig1 = "ip=dhcp"
+  qemu_os = "l26"
+
+  agent = 1
+  hastate = "started"
+  automatic_reboot = false
+
+  disk {
+    cache = "none"
+    discard = "on"
+    size = "25G"
+    storage = "all_disks_pool"
+    type = "scsi"
+  }
+
+  network {
+    bridge = "vmbr0"
+    macaddr   = "76:61:74:6f:30:38" # Preset MAC address registered with the university. Needs to be in sync with host-config
+    model = "virtio"
+  }
+
+  network {
+    bridge = "vmbr1"
+    model = "virtio"
+  }
+
+  lifecycle {
+    ignore_changes = [
+      # Ignore changes in target_node because this is an HA VM
+      target_node,
+      # We should not change the VM after cloning
+      clone,
+      full_clone,
+      # The following attributes are inherited from the template and should not be changed
+      qemu_os,
+      ipconfig0,
+      ipconfig1,
+      network,
+      ciuser,
+      agent,
+      sshkeys,
+      # These attributes are unstable after the initial creation. They change in value and don't get
+      # updated in the Terraform state. This is probably a bug in the Proxmox provider.
+      hostpci,
+      # These attributes cause VM restarts when changed. We'll manage them manually.
+      disk,
+      # These attributes show up as changes when we try to import the VM.
+      additional_wait,
+      automatic_reboot,
+      clone_wait,
+      define_connection_info,
+    ]
+    prevent_removal = true
+  }
+}
Apply the Terraform configuration
In the development container, run the following commands to apply the Terraform configuration:
./proxmox/provision.sh misc-service-machinesPlease ensure that the VM is the only change to be performed by the provisioner. If changes to another VM are shown, someone probably forgot to commit their changes. Please abort and consult with the team before proceeding.
Example output:
root@ea158e5a1675:/infra-config# ./proxmox/provision.sh misc-service-machines
Agent pid 11
Found valid cached password. Using it.
Not in dry run. Running `terragrunt apply`
proxmox_lxc.alertmanager: Refreshing state... [id=wato-derek1/lxc/102]
proxmox_vm_qemu.elastic: Refreshing state... [id=wato-delta/qemu/103]
proxmox_vm_qemu.backup: Refreshing state... [id=wato-wato1/qemu/127]
proxmox_vm_qemu.docker-registry: Refreshing state... [id=wato-wato2/qemu/101]
proxmox_vm_qemu.grafana: Refreshing state... [id=wato-wato1/qemu/118]

Terraform used the selected providers to generate the following execution
plan. Resource actions are indicated with the following symbols:
  + create

Terraform will perform the following actions:

  # proxmox_vm_qemu.ha-microk8s1 will be created
  + resource "proxmox_vm_qemu" "ha-microk8s1" {
      + additional_wait             = 5
      + agent                       = 1
      + automatic_reboot            = false
      + balloon                     = 0
      + bios                        = "ovmf"
      + boot                        = (known after apply)
      + bootdisk                    = (known after apply)
      + ciuser                      = "watonomous"
      + clone                       = "ubuntu-22-04-cloudinit-v1"
      + clone_wait                  = 10
      + cores                       = 2
      + cpu                         = "host"
      + default_ipv4_address        = (known after apply)
      + define_connection_info      = true
      + desc                        = "This VM is managed by Terraform. Please do not modify it manually."
      + force_create                = false
      + force_recreate_on_change_of = "v0.0.1"
      + full_clone                  = true
      + guest_agent_ready_timeout   = 100
      + hastate                     = "started"
      + hotplug                     = "network,disk,usb"
      + id                          = (known after apply)
      + ipconfig0                   = "ip=dhcp"
      + ipconfig1                   = "ip=dhcp"
      + kvm                         = true
      + memory                      = 10240
      + name                        = "ha-microk8s1"
      + nameserver                  = (known after apply)
      + onboot                      = false
      + oncreate                    = true
      + preprovision                = true
      + qemu_os                     = "l26"
      + reboot_required             = (known after apply)
      + scsihw                      = "virtio-scsi-pci"
      + searchdomain                = (known after apply)
      + sockets                     = 1
      + ssh_host                    = (known after apply)
      + ssh_port                    = (known after apply)
      + tablet                      = true
      + target_node                 = "wato-thor"
      + unused_disk                 = (known after apply)
      + vcpus                       = 0
      + vlan                        = -1
      + vmid                        = (known after apply)

      + disk {
          + backup             = true
          + cache              = "none"
          + discard            = "on"
          + file               = (known after apply)
          + format             = (known after apply)
          + iops               = 0
          + iops_max           = 0
          + iops_max_length    = 0
          + iops_rd            = 0
          + iops_rd_max        = 0
          + iops_rd_max_length = 0
          + iops_wr            = 0
          + iops_wr_max        = 0
          + iops_wr_max_length = 0
          + iothread           = 0
          + mbps               = 0
          + mbps_rd            = 0
          + mbps_rd_max        = 0
          + mbps_wr            = 0
          + mbps_wr_max        = 0
          + media              = (known after apply)
          + replicate          = 0
          + size               = "15G"
          + slot               = (known after apply)
          + ssd                = 0
          + storage            = "all_disks_pool"
          + storage_type       = (known after apply)
          + type               = "scsi"
          + volume             = (known after apply)
        }

      + network {
          + bridge    = "vmbr0"
          + firewall  = false
          + link_down = false
          + macaddr   = "76:61:74:6f:30:35"
          + model     = "virtio"
          + queues    = (known after apply)
          + rate      = (known after apply)
          + tag       = -1
        }
      + network {
          + bridge    = "vmbr1"
          + firewall  = false
          + link_down = false
          + macaddr   = (known after apply)
          + model     = "virtio"
          + queues    = (known after apply)
          + rate      = (known after apply)
          + tag       = -1
        }
    }

Plan: 1 to add, 0 to change, 0 to destroy.

Do you want to perform these actions?
  Terraform will perform the actions described above.
  Only 'yes' will be accepted to approve.

  Enter a value:
If everything looks good, type yes and press Enter to apply the changes.
If you waited too long (more than around 30 seconds), you may get a 401 authentication failure error.
This is because the TOTP code has expired.
Simply rerun the command to continue.
After confirming, you should see the following output:
proxmox_vm_qemu.ha-microk8s1: Creating...
proxmox_vm_qemu.ha-microk8s1: Still creating... [10s elapsed]
proxmox_vm_qemu.ha-microk8s1: Still creating... [20s elapsed]
proxmox_vm_qemu.ha-microk8s1: Still creating... [30s elapsed]
proxmox_vm_qemu.ha-microk8s1: Still creating... [40s elapsed]
proxmox_vm_qemu.ha-microk8s1: Still creating... [50s elapsed]
proxmox_vm_qemu.ha-microk8s1: Still creating... [1m0s elapsed]
proxmox_vm_qemu.ha-microk8s1: Still creating... [1m10s elapsed]
proxmox_vm_qemu.ha-microk8s1: Still creating... [1m20s elapsed]
proxmox_vm_qemu.ha-microk8s1: Still creating... [1m30s elapsed]
proxmox_vm_qemu.ha-microk8s1: Creation complete after 1m36s [id=wato-thor/qemu/105]

Apply complete! Resources: 1 added, 0 changed, 0 destroyed.
Wrote outputs to ./outputs/proxmox/misc-service-machines/outputs.yaml and ./outputs/proxmox/misc-service-machines/outputs.secret.yaml
Wrote Terraform state to ./outputs/proxmox/misc-service-machines/state.encrypted.dynamic.yaml
Manually populate the SSH public key for the provisioner
The newer sshd servers appear to disable password authentication by default.
To allow the provisioner to SSH into the VM, we need to manually populate the SSH public key for the provisioner.
To do this, find the SSH public key and add it to the VM’s authorized keys file.
At the time of writing, the SSH public key is stored in the infra-config repo.
To access the VM to place the SSH key, we can use the serial terminal.
SSH into the host machine (wato-thor in this case, credentials are in 1Password WATcloud vault under Proxmox) and run the following command.
Once the serial terminal is open, you can get the login prompt by pressing
root@wato-thor:~# qm terminal 105
starting serial terminal on interface serial0 (press Ctrl+O to exit)

ha-microk8s1 login:
The username and password for the VM are stored in 1Password under the WATonomous VM User entry.
You may need to use one of the old passwords listed, because the VM template may be created before the latest password change.
During the initial provision, cloud-init will automatically provision users, networking, and other configurations. It may be a few minutes before the default user is created. The cloud-init logs will appear in the serial console. After you see the following message, the user should be created:
ci-info: no authorized SSH keys fingerprints found for user watonomous.
<14>Aug 17 00:24:12 cloud-init: #############################################################
<14>Aug 17 00:24:12 cloud-init: -----BEGIN SSH HOST KEY FINGERPRINTS-----
<14>Aug 17 00:24:12 cloud-init: 1024 SHA256:DZJKZ+0GN05s0JPtepgd1SnD4WN575LWqNw25v6oicY root@ha-microk8s1 (DSA)
<14>Aug 17 00:24:12 cloud-init: 256 SHA256:bsafc+Q5HAkHbIdKmkEs153//cmo4dGr0qnRq8PnMrg root@ha-microk8s1 (ECDSA)
<14>Aug 17 00:24:12 cloud-init: 256 SHA256:M1HFT3xyGjgbBHWJOR7EvV6agzbah7YFaEd8eXrnDcA root@ha-microk8s1 (ED25519)
<14>Aug 17 00:24:12 cloud-init: 3072 SHA256:WGcM+4EfykW7SnaclZ5P/vSzkDQjKRfWpwHE9grrPFY root@ha-microk8s1 (RSA)
<14>Aug 17 00:24:12 cloud-init: -----END SSH HOST KEY FINGERPRINTS-----
<14>Aug 17 00:24:12 cloud-init: #############################################################
-----BEGIN SSH HOST KEY KEYS-----
ecdsa-sha2-nistp256 AAAAE2VjZHNhLXNoYTItbmlzdHAyNTYAAAAIbmlzdHAyNTYAAABBBFqZEkE1h7WcCyIaEJxdkhKjgKWGFzfpQIPzJMzuY1pW56hBsRaKLf5C6pZcCsmCx7wn4MsrX4Ki4aNR9/B2qVY= root@ha-microk8s1
ssh-ed25519 AAAAC3NzaC1lZDI1NTE5AAAAINYvjkcFIMoq9BNNXSSGiTs3/fVHroFmB1tZh+1XYVj0 root@ha-microk8s1
ssh-rsa AAAAB3NzaC1yc2EAAAADAQABAAABgQC4EJfO2EOH6SFkVWR64OQSHY3cY7UCFKvOYiq/2XyT6GeevA3dbGf3JiAS3XEZh5QoAW/tZ9d7SNKAN3cagbsL7DYVbOgJh37L3hJ8av/B9BUiDWFh3Xd1o4eBsl3SA1RV6ftxS/aKlt78D/JyWsX/F9QKSwU1z7hXd+lpb5OUU0GNA1q+0wdVK14hOUiem06iBmabIn6KYLexVsMkKt5H/EYVmDkgMqF/rnWRhfUiabMwqDrp2QNOTCPCgEr65PGAx7reWkkZw236RoQjp3puR0RgdJTMriLLabqxMxstC7zqWQaigr6q/BWtzmKGkZUrK2859SsrbH2dWGbLygzDGksW41mEL27jaecl7ocihsB5U3jX68LowVcQD+UwzIBFMlprZEpXzw1Od2ouXkRdgTQGsxV2c63vZdlNP7wecH/TdUtAkmvvjyvXH15EEmwSYL7LL/b4ciC9UFeBP8cjS2JW1af2tjfX3kIhdyJrbpnJQP4MqIHz8KfFYBG8488= root@ha-microk8s1
-----END SSH HOST KEY KEYS-----
[  342.249334] cloud-init[1352]: Cloud-init v. 23.3.1-0ubuntu1~22.04.1 finished at Sat, 17 Aug 2024 00:24:12 +0000. Datasource DataSourceNoCloud [seed=/dev/sr0][dsmode=net].  Up 342.24 seconds
After entering the username and password, you should be able to access the VM:
ha-microk8s1 login: watonomous
Password:
Welcome to Ubuntu 22.04.3 LTS (GNU/Linux 5.15.0-87-generic x86_64)

 * Documentation:  https://help.ubuntu.com
 * Management:     https://landscape.canonical.com
 * Support:        https://ubuntu.com/advantage

  System information as of Sat Aug 17 00:27:55 UTC 2024

  System load:           0.0
  Usage of /:            26.9% of 14.36GB
  Memory usage:          2%
  Swap usage:            0%
  Processes:             115
  Users logged in:       0
  IPv4 address for eth0: 129.97.29.205
  IPv6 address for eth0: 2620:101:f000:8202:7461:74ff:fe6f:3035
  IPv4 address for eth1: 10.0.50.225

Expanded Security Maintenance for Applications is not enabled.

172 updates can be applied immediately.
116 of these updates are standard security updates.
To see these additional updates run: apt list --upgradable

Enable ESM Apps to receive additional future security updates.
See https://ubuntu.com/esm or run: sudo pro status


The programs included with the Ubuntu system are free software;
the exact distribution terms for each program are described in the
individual files in /usr/share/doc/*/copyright.

Ubuntu comes with ABSOLUTELY NO WARRANTY, to the extent permitted by
applicable law.

To run a command as administrator (user "root"), use "sudo <command>".
See "man sudo_root" for details.

watonomous@ha-microk8s1:~$
To populate the SSH public key, simply add it to the ~/.ssh/authorized_keys file:
# Note that the following key is subject to change. Please make sure you have the latest key.
echo "ecdsa-sha2-nistp256 AAAAE2VjZHNhLXNoYTItbmlzdHAyNTYAAAAIbmlzdHAyNTYAAABBBA/JWeGTFa+jlntmVWczbqeVIKndgaMj1Pyh2u3juzyEnllONTrWMZUI1e8RaEPS4rcXPxb9yDAhsBxZSCY5LWI= wato_ansible_key" >> ~/.ssh/authorized_keys
Restart the VM to apply network changes
After cloud-init has finished, the VM will have the correct hostname.
Restart the VM to trigger a DHCP reset2.
This will allow the cluster switch to receive the new hostname and assign a temporary .watocluster.local domain for initial provisioning.
After the VM has restarted, you should be able to look it up using the cluster DNS server (10.0.50.254):
root@wato-thor:~# nslookup ha-microk8s1.watocluster.local 10.0.50.254
Server:		10.0.50.254
Address:	10.0.50.254#53

Non-authoritative answer:
Name:	ha-microk8s1.watocluster.local
Address: 10.0.50.225
Create the Ansible configuration for the new VM
Now, it’s time to update the host registry with the new VM’s configuration. This configuration can be derived from other VM configurations of the same type. Because we configured the VM to use a MAC address for the university network, we update the corresponding entry in the configuration.
Note that we left some parts of the configuration commented out. Specifically, the parts related to microk8s. This is because there is a circular reference—some parts of the repo (namely DNS management) depend on the microk8s configuration, and provisioning VMs depends on the DNS configuration. We will add back the microk8s configuration after the base configuration is applied.
Also note that ansible_hosts contains the .watocluster.local domain that is automatically assigned by the cluster switch.
diff --git a/directory/hosts/host-config.yml b/directory/hosts/host-config.yml
index 2b1967594d..7d02d1eaf9 100644
--- a/directory/hosts/host-config.yml
+++ b/directory/hosts/host-config.yml
@@ -26,7 +26,7 @@ _anchors:
     - name: &derek2_microk8s1_ext_hostname_cname_target cph-wato-vm7.uwaterloo.ca
       mac_address: 76:61:74:6f:30:37
       notes: Ports 80 and 443 are exposed externally
-    - name: cph-wato-vm8.uwaterloo.ca # manually parked at prometheus lxc container
+    - name: &ha_microk8s1_ext_hostname_cname_target cph-wato-vm8.uwaterloo.ca
       mac_address: 76:61:74:6f:30:38
       notes: Ports 80 and 443 are exposed externally
     - name: &tr_ubuntu1_ext_hostname_cname_target cph-wato-vm9.uwaterloo.ca
@@ -65,6 +65,7 @@ _anchors:
     - &wato2-microk8s1-cluster-ip 10.0.50.152
     - &tr-microk8s1-cluster-ip 10.0.50.153
     - &derek2-microk8s1-cluster-ip 10.0.50.154
+    - &ha-microk8s1-cluster-ip 10.0.50.155
     # Slurm VMs
     - &tr-slurm1-cluster-ip 10.0.50.180
     - &wato2-slurm1-cluster-ip 10.0.50.181
@@ -1566,6 +1567,63 @@ hosts:
       - name: swap_nodes
       - name: filebeat_nodes
         elastic_host: elastic.cluster.watonomous.ca
+  - name: ha-microk8s1
+    ansible_hosts:
+      - ha-microk8s1.watocluster.local
+    ansible_user: watonomous
+    networks:
+      - <<: *ens18-university-network
+        interface: eth0
+      - dns_records:
+          - name: &ha_microk8s1_ext_hostname ha-microk8s1.ext.watonomous.ca
+            type: CNAME
+            # Need to be consistent with the MAC configuration (configured in the Proxmox provisioner)
+            value: *ha_microk8s1_ext_hostname_cname_target
+        managed_by_ansible: false
+      - comments: --- Cluster Network ---
+        hostnames: [ha-microk8s1.watocluster.local]
+        interface: eth1
+        ip_address: *ha-microk8s1-cluster-ip
+        netmask_length: 24
+        dns_records:
+          - name: ha-microk8s1.cluster.watonomous.ca
+            type: A
+            value: *ha-microk8s1-cluster-ip
+        dhcp4: false
+        # TODO: Now that we have both netplan and /etc/network/interfaces, set managed_by_ansible
+        # to false by default in the schema and in the ansible config
+        managed_by_ansible: false
+        managed_by_ansible_netplan: true
+    groups:
+      - name: service_nodes
+      - name: user_nodes
+        include_users:
+          - watonomous
+          # to guard against programs adding users in the managed uid range
+          - user3000
+        include_groups:
+          - user3000
+        user_ssh_key_base_dir: /home/%u/.ssh
+        # use default permissions for the user's .ssh directory
+        use_strict_ssh_key_dir_permissions: false
+      - name: ssh_hardened_nodes
+      - name: prometheus_node_exporter_nodes
+        prometheus_target: ha-microk8s1.cluster.watonomous.ca
+      - name: rsyslog_client_nodes
+      - name: monitored_nodes
+        checks:
+          - <<: *ping-cluster-new
+      # - name: microk8s_nodes
+      #   microk8s_ingress_ext_addrs:
+      #     - *ha_microk8s1_ext_hostname
+      #   microk8s_ingress_cluster_addrs:
+      #     - *ha-microk8s1-cluster-ip
+      # - name: microk8s_ha_nodes
+      #   microk8s_node_ip: *ha-microk8s1-cluster-ip
+      - name: swap_nodes
+      - name: filebeat_nodes
+        elastic_host: elastic.cluster.watonomous.ca
   - name: tr-slurm1
     ansible_hosts:
       - tr-slurm1.cluster.watonomous.ca
Provision DNS records
Run the following command to provision the DNS records:
./cloudflare/provision.shThis command will ask for confirmation before making changes. Please review the changes carefully before confirming. The changes should all be related to the new VM.
Make sure that the VM is accessible via Ansible
After the configuration is updated, we should be able to access the VM via Ansible. Run the following command to confirm:
root@ea158e5a1675:/infra-config# ./ansible/run.sh ansible ha-microk8s1 -m shell -a "whoami"
Agent pid 11
Found valid cached password. Using it.
Identity added: (stdin) (wato_ansible_key)
ha-microk8s1 | CHANGED | rc=0 >>
watonomous
Choose the Ansible playbook to Run
Now that the VM is accessible via Ansible, we can run the appropriate playbook to configure the VM. At the time of writing, a few playbooks don’t support running against single VMs (they must be run against the entire cluster). We will comment them out for the initial provision.
diff --git a/ansible/playbooks/all.yml b/ansible/playbooks/all.yml
index f50dba708e..caeacb5682 100644
--- a/ansible/playbooks/all.yml
+++ b/ansible/playbooks/all.yml
@@ -23,5 +23,5 @@
 - import_playbook: ipmi.yml
 - import_playbook: swap.yml
 - import_playbook: slurmd.yml
-- import_playbook: microk8s.yml # FIXME: requires the master node to be included in the hosts list, so we can't run each host isolated using --hosts.
-- import_playbook: prometheus.yml # FIXME: this playbook requires running Ansible with all prometheus targets in the inventory. Generate the inventory before running Ansible so that Prometheus can be provisioned by itself.
+# - import_playbook: microk8s.yml # FIXME: requires the master node to be included in the hosts list, so we can't run each host isolated using --hosts.
+# - import_playbook: prometheus.yml # FIXME: this playbook requires running Ansible with all prometheus targets in the inventory. Generate the inventory before running Ansible so that Prometheus can be provisioned by itself.
Run the Ansible playbook
Now, we can run the Ansible playbook to configure the VM.
./ansible/provision.sh --hosts ha-microk8s1 allThis command will ask for confirmation before making changes, and will take some time to complete. The VM will automatically restart a few times during the process.
In the middle of the process, Ansible may get stuck at the following task:
RUNNING HANDLER [common : Apply netplan] ******************************************************************************************************************************************************************************************************************************************This is because the VM’s networking configuration changed and is no longer accessible via *.watocluster.local.
When this happens, you can interrupt the process (Ctrl+C) and replace the ansible_hosts entry in the configuration with the new domain provisioned earlier.
diff --git a/directory/hosts/host-config.yml b/directory/hosts/host-config.yml
index be503f2e43..48fd1595b8 100644
--- a/directory/hosts/host-config.yml
+++ b/directory/hosts/host-config.yml
@@ -1569,7 +1569,7 @@ hosts:
         elastic_host: elastic.cluster.watonomous.ca
   - name: ha-microk8s1
     ansible_hosts:
-      - ha-microk8s1.watocluster.local
+      - ha-microk8s1.cluster.watonomous.ca
     ansible_user: watonomous
     networks:
       - <<: *ens18-university-network
After making the change, rerun the Ansible playbook:
./ansible/provision.sh --hosts ha-microk8s1 allThe playbook should complete successfully:
PLAY RECAP ************************************************************************************************************************************************************************************************************************************************************************
ha-microk8s1               : ok=96   changed=30   unreachable=0    failed=0    skipped=40   rescued=0    ignored=0
Add back commented-out configuration and run the remaining Ansible playbooks
Now that the initial provisioning is complete, we can add back the commented-out configuration for the microk8s VMs.
diff --git a/directory/hosts/host-config.yml b/directory/hosts/host-config.yml
index 48fd1595b8..4af24e27c9 100644
--- a/directory/hosts/host-config.yml
+++ b/directory/hosts/host-config.yml
@@ -1613,13 +1613,13 @@ hosts:
       - name: monitored_nodes
         checks:
           - <<: *ping-cluster-new
-      # - name: microk8s_nodes
-      #   microk8s_ingress_ext_addrs:
-      #     - *ha_microk8s1_ext_hostname
-      #   microk8s_ingress_cluster_addrs:
-      #     - *ha-microk8s1-cluster-ip
-      # - name: microk8s_ha_nodes
-      #   microk8s_node_ip: *ha-microk8s1-cluster-ip
+      - name: microk8s_nodes
+        microk8s_ingress_ext_addrs:
+          - *ha_microk8s1_ext_hostname
+        microk8s_ingress_cluster_addrs:
+          - *ha-microk8s1-cluster-ip
+      - name: microk8s_ha_nodes
+        microk8s_node_ip: *ha-microk8s1-cluster-ip
       - name: swap_nodes
       - name: filebeat_nodes
         elastic_host: elastic.cluster.watonomous.ca
Now, we can run the remaining Ansible playbooks. This time, we run them against the entire cluster.
./ansible/provision.sh microk8s
./ansible/provision.sh prometheus
Provision DNS records again
This step is machine-specific. In this example, we added back the microk8s configuration, which some services depend on. This requires provisioning the DNS records with the latest configuration.
./cloudflare/provision.shOpen a PR and review changes
If you haven’t already, please open a pull request (PR) and review the changes with the team.
GPU Passthrough
This note is derived from https://github.com/WATonomous/infra-notes/blob/7786dfe4cd2af74e76530285e1141d06f5ab2df2/gpu-passthrough.md
Passing through GPUs to VMs is a complex process that requires modifying many parts of the host system. Fortunately, the official Proxmox documentation contains a guide on how to do this: PCI Passthrough. This guide should be sufficient, and other resources (such as various forums) may provide outdated information or incorrect steps.
Quirks
- When passing through the GPU, there might need to be some fiddling around with whether or not to enable “Primary GPU”:
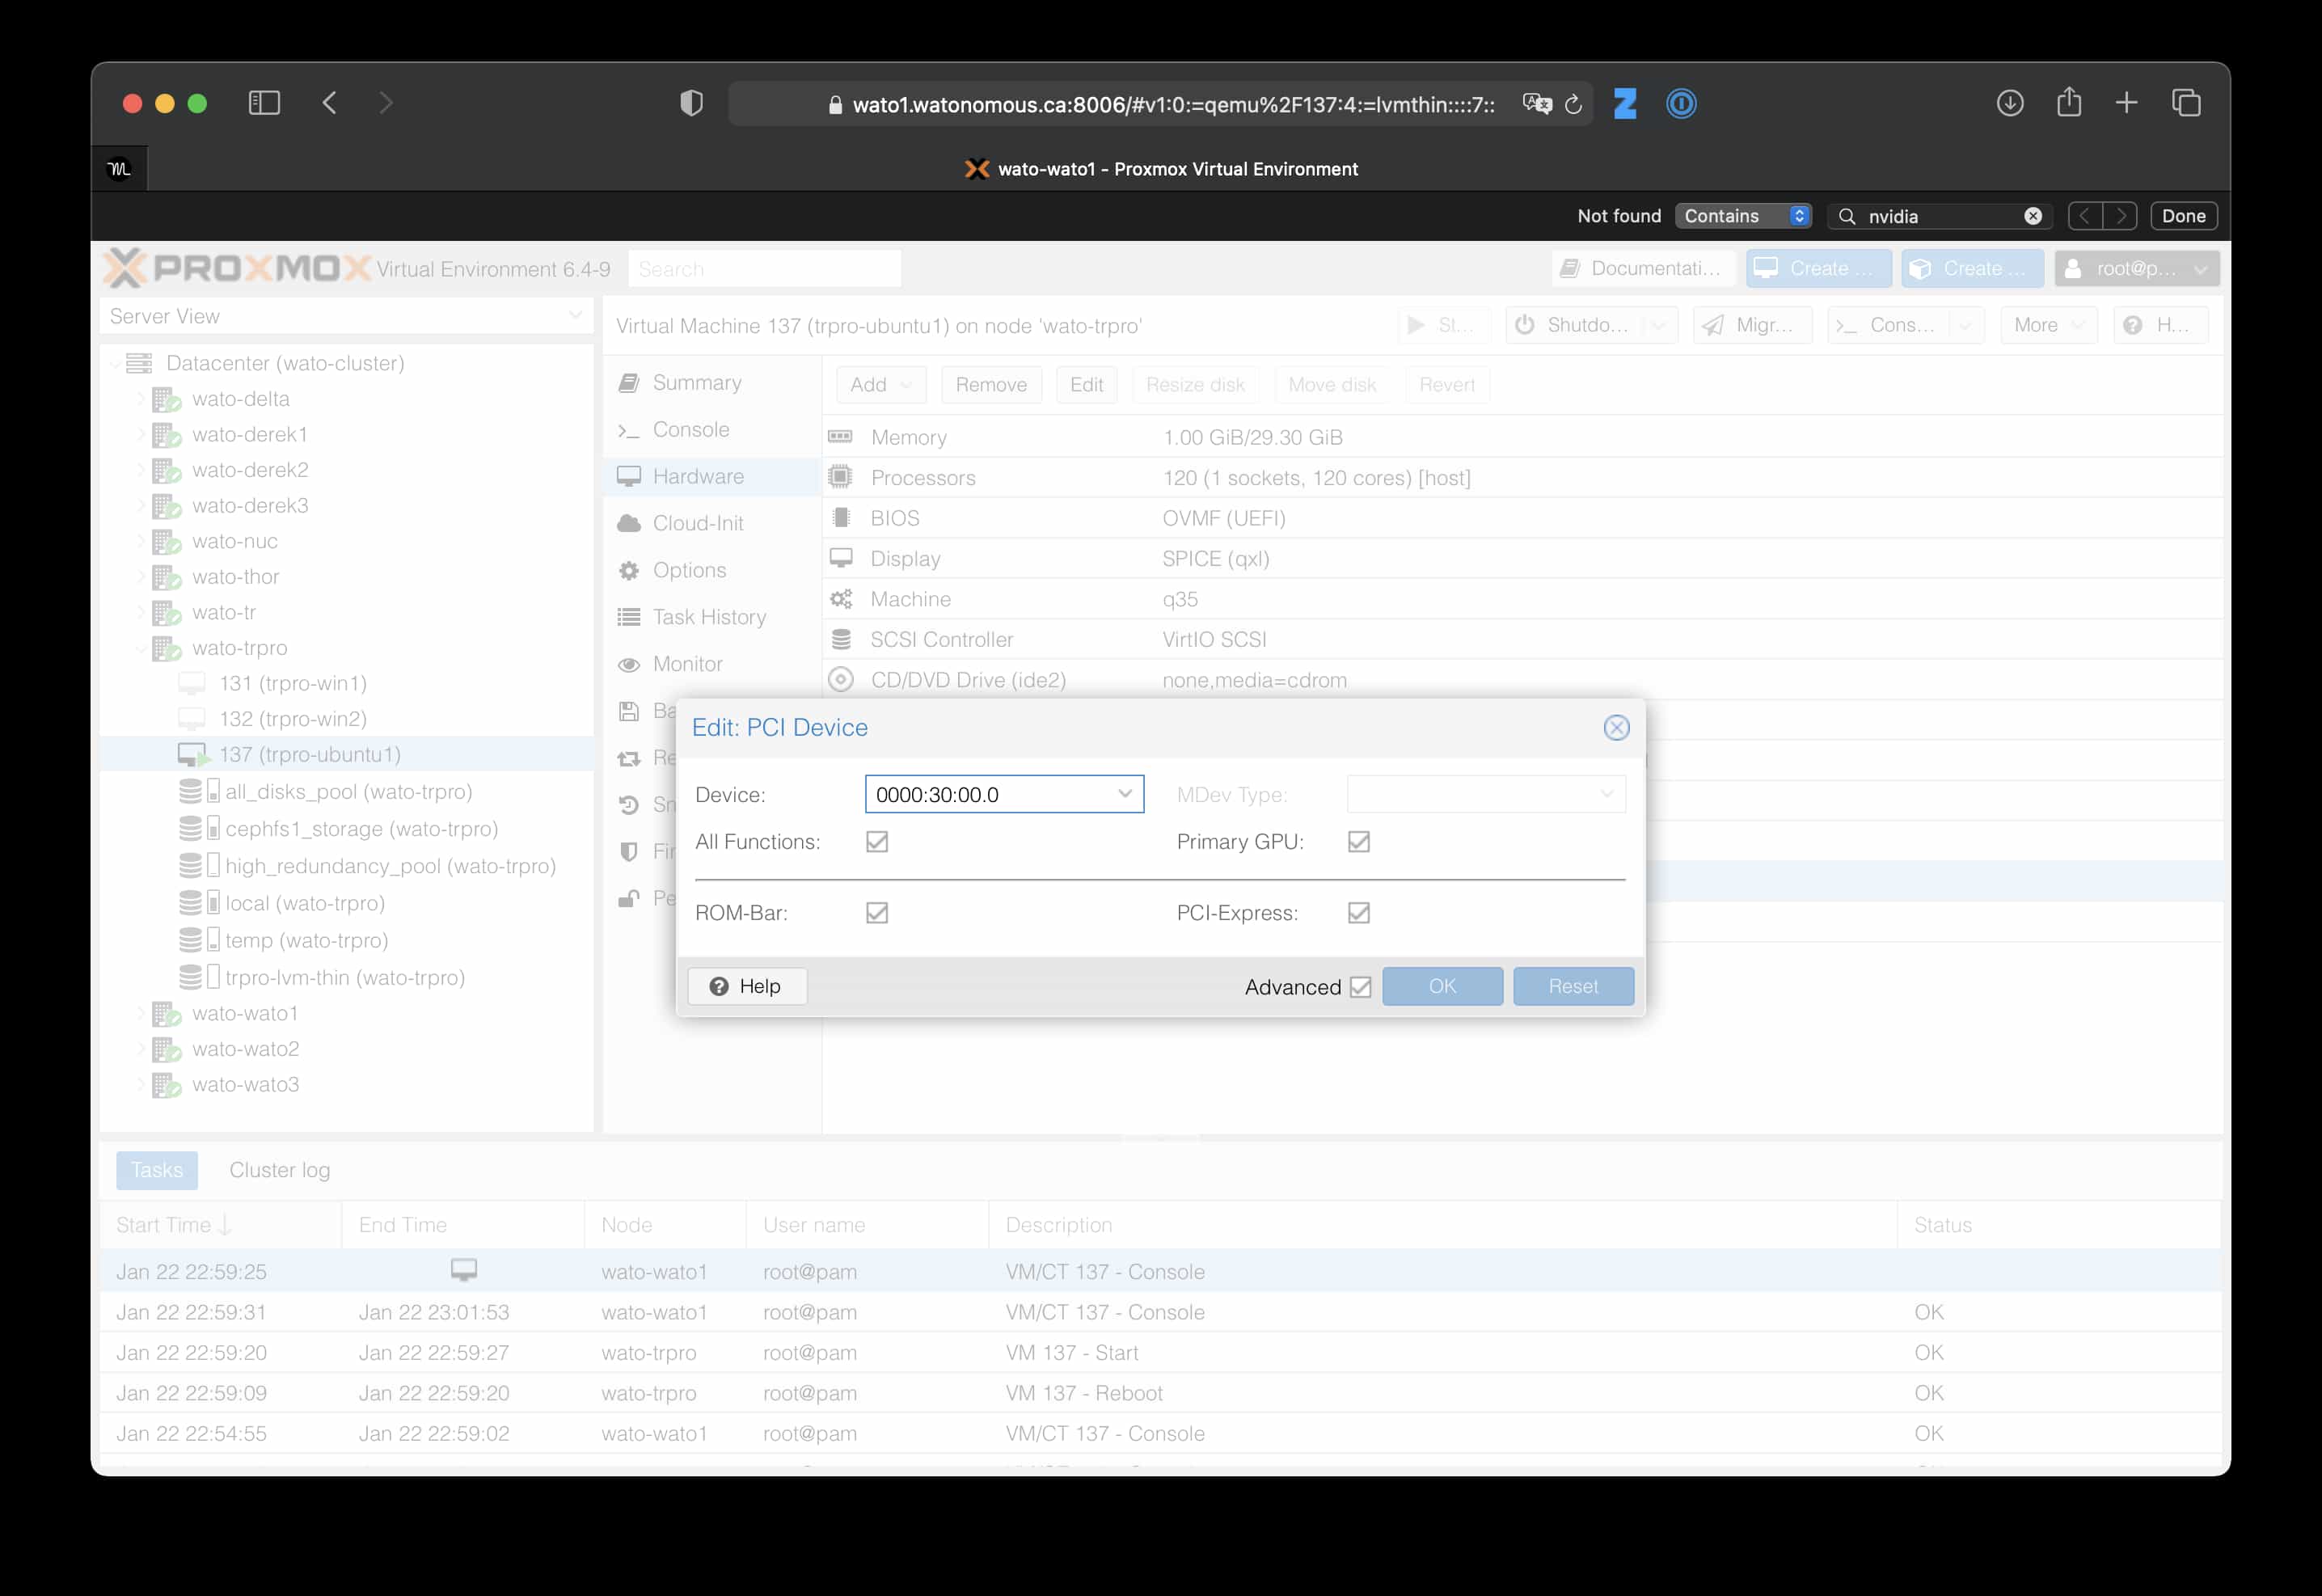
- “Primary GPU” appears to be required when using GTX 1080 on Ubuntu (otherwise
nvidia-smithrows an error) or Windows VMs (otherwise we get Error 43. Though with primary GPU enabled, we can’t access the display from the Proxmox console anymore). It doesn’t appear to be required when passing through an RTX 3090 to a Windows VM.
- “Primary GPU” appears to be required when using GTX 1080 on Ubuntu (otherwise
- When desktop GUI is installed and a display is plugged in, GPU passthrough will stop working. It will error out the first time the VM is started, then it will hang the second time the VM is started. Brief discussion here. The solution is to uninstall the desktop GUI or not plug in a display.

The following are some machine-specific quirks that we have encountered.
trpro (ASUS WRX80 Motherboard)
When a GPU is placed in the PCIe slot right beside the RAM, passthrough won’t work. The error code is something about invalid VBIOS and then an error message about being stuck in power state D3. When we pass the VM a romfile manually according to the instructions in the Proxmox PCI passthrough doc the invalid VBIOS error goes away but we are still stuck in power state D3. (Source)
PCI bandwidth and GPUs
PCIe gen4 appears to require a stronger signal quality than gen3. When using PCIe risers at gen4 speeds, we encountered PCIe errors. See this thread for more info on this.
We may be able to resolve this by replacing our current passive risers with retimers. See this discussion for more information on this. However, retimers are much more expensive than passive risers.
The current workaround is to set the link speed to gen3 or below. This reduces the bandwidth available to the GPUs, but for a lot of workloads, this doesn’t substantially decrease the performance.